Baking gluten-free banana bread that stays moist and tender can feel challenging, especially when you’re managing IBS symptoms. This strawberry banana bread recipe solves that problem with low FODMAP ingredients and proper gluten-free baking techniques. You’ll create a delicious loaf that’s safe for your digestive system and full of natural sweetness.
This recipe works for beginners with basic baking skills. You’ll need about 15 minutes for preparation and 55 minutes for baking. The total time from start to finish is roughly 1 hour and 20 minutes, including cooling.
You’ll need a standard loaf tin, mixing bowls, measuring cups, and a few simple ingredients. Most items are available at regular supermarkets. The recipe uses common gluten-free flour blends and ripe bananas for natural sweetness without high FODMAP triggers.
Why this banana strawberry bread works for IBS
This gluten-free banana bread uses ingredients that sit comfortably within low FODMAP guidelines during the elimination phase. Bananas become low FODMAP when they’re ripe but not overripe. You’ll use firm ripe bananas with just a few brown spots, not completely brown ones that contain higher fructose levels.
Strawberries stay low FODMAP at moderate portions. This recipe keeps the serving size appropriate so each slice contains a safe amount. The natural sweetness from both fruits means you need less added sugar, making this a FODMAP friendly dessert option.
The gluten-free flour blend replaces wheat flour entirely, removing gluten and fructans that trigger IBS symptoms. Good quality gluten-free blends contain rice flour, tapioca starch, and potato starch. These create the right texture without gut irritants.
We use lactose-free butter or oil instead of regular dairy products. This keeps the bread dairy-free and suitable for those managing multiple food sensitivities. The recipe also includes eggs, which provide structure and moisture without any FODMAP concerns.
Each slice delivers natural energy from fruit sugars, fibre from gluten-free flour, and protein from eggs. The nutritional balance makes this bread suitable for breakfast or snacks throughout your day.
Gather your gluten-free baking essentials
Here’s everything you need for this low FODMAP banana bread:
Dry ingredients:
- 250g gluten-free plain flour (look for blends with xanthan gum included)
- 1 teaspoon baking powder
- ½ teaspoon bicarbonate of soda
- ¼ teaspoon salt
- 100g caster sugar
Wet ingredients:
- 3 medium ripe bananas (about 300g peeled weight)
- 2 large eggs at room temperature
- 80ml melted lactose-free butter or light olive oil
- 1 teaspoon vanilla extract
- 150g fresh strawberries
Equipment needed:
- 900g loaf tin (23cm x 13cm)
- Two mixing bowls (one large, one medium)
- Measuring cups and spoons
- Fork for mashing bananas
- Rubber spatula for folding
- Sharp knife and chopping board
Choose gluten-free flour blends specifically designed for baking. Brands like Doves Farm or Bob’s Red Mill work well. Avoid single-ingredient flours like pure rice flour, as they won’t provide the right texture.
Select bananas with yellow skin and small brown spots. Completely green bananas taste starchy, while overly brown ones contain too much fructose. The right ripeness matters for both flavour and FODMAP content.
Pick firm, bright red strawberries without soft spots. Wash them just before using to prevent them becoming waterlogged during storage.
Substitution options: Replace eggs with 2 tablespoons ground flaxseed mixed with 6 tablespoons water (let sit for 5 minutes). Swap strawberries for blueberries at the same weight, keeping within low FODMAP serving sizes.
Prepare ingredients for optimal texture
Start by preheating your oven to 175°C (350°F). Line your loaf tin with baking paper, leaving some overhang on the long sides. This makes removing the bread much easier later.
Peel your bananas and place them in a medium bowl. Mash with a fork until mostly smooth with a few small lumps remaining. You want about 1 cup of mashed banana. Overmashing creates a gummy texture in gluten-free baking, so stop when you still see some texture.
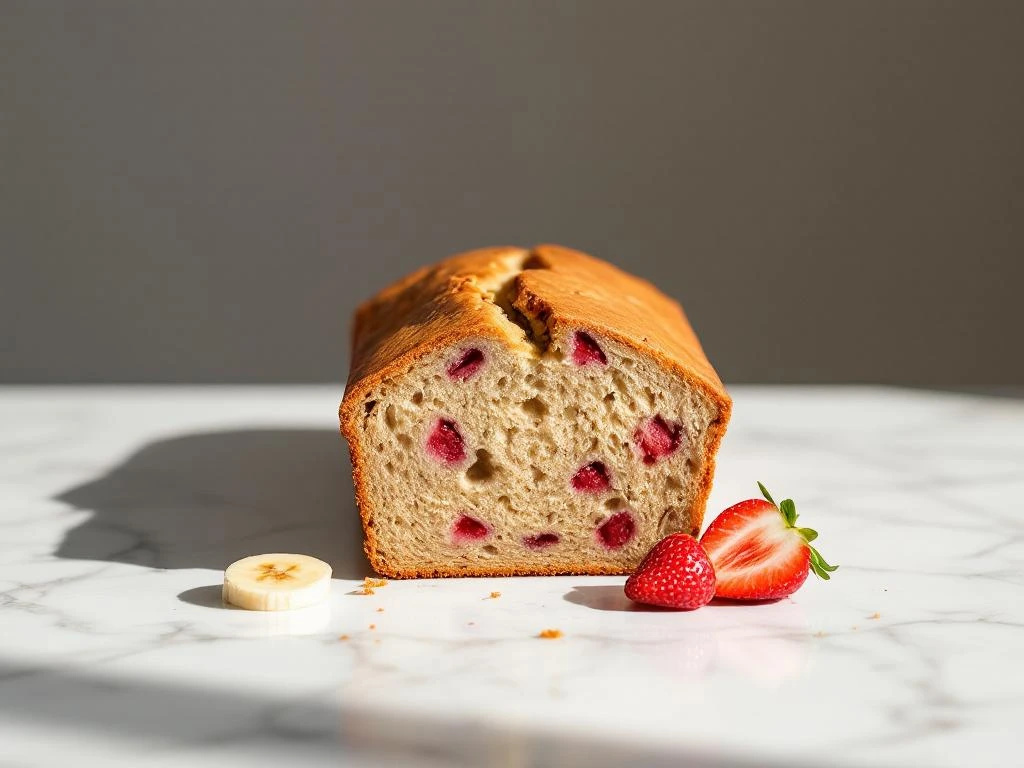
Wash strawberries under cold water and pat them completely dry with kitchen paper. Remove the green tops and cut each strawberry into quarters. Smaller pieces distribute better throughout the batter and prevent large pockets of moisture that make the bread soggy.
Measure your gluten-free flour correctly by spooning it into your measuring cup and leveling off with a knife. Don’t scoop directly from the bag, as this packs too much flour and creates dense, dry bread. Too much flour is the most common mistake in gluten-free baking.
Bring your eggs and lactose-free butter to room temperature before mixing. Cold ingredients don’t combine well and can create a heavy texture. Leave eggs on the counter for 30 minutes or place them in warm water for 5 minutes.
Melt your butter gently and let it cool slightly. You want it liquid but not hot, as hot butter can start cooking the eggs when you mix them together.
Mix the batter using the folding method
Combine all dry ingredients in your large bowl. Whisk the gluten-free flour, baking powder, bicarbonate of soda, salt, and sugar together thoroughly. This distributes the leavening agents evenly so your bread rises uniformly.
In your medium bowl, whisk together the mashed bananas, eggs, melted butter, and vanilla extract. Mix until you see no streaks of egg yolk. The mixture should look smooth and slightly frothy.
Pour the wet ingredients into the dry ingredients all at once. Use your rubber spatula to fold them together gently. Scrape from the bottom of the bowl up and over, rotating the bowl as you work. The batter will look thick and slightly lumpy.
Stop mixing when you see just a few small streaks of flour remaining. Overmixing gluten-free batter creates a gummy, dense texture. The batter should look slightly lumpy and thick enough to hold its shape on the spatula.
Add your quartered strawberries to the batter. Fold them in with just 3 to 4 gentle strokes. You want them distributed throughout without crushing them. Crushed strawberries release too much juice and create dense spots in your bread.
Visual check: Your finished batter should be thick like porridge, not pourable like pancake batter. It should hold soft peaks when you lift the spatula. If it looks too thin, you may have undermeasured your flour.
Scrape the batter into your prepared loaf tin. Smooth the top gently with your spatula. The batter won’t spread much during baking, so shape it how you want the top to look.
Bake and test for perfect doneness
Place your loaf tin in the centre of your preheated oven. Bake at 175°C for 50 to 55 minutes without opening the oven door. Opening the door early causes temperature drops that make gluten-free bread collapse in the middle.
Watch for these signs of proper baking: The top turns golden brown, the edges pull slightly away from the tin, and the centre looks set rather than wet. The bread should spring back lightly when you press the centre gently.
Test for doneness at 50 minutes using a wooden skewer or toothpick. Insert it into the centre of the loaf, going all the way to the bottom. Pull it out and check what’s on it.
A properly baked loaf shows a skewer with just a few moist crumbs clinging to it. The skewer shouldn’t come out completely clean (that means overbaked) or with wet batter (underbaked). A few sticky crumbs are perfect for this easy gluten-free recipe.
If your skewer shows wet batter, bake for another 5 minutes and test again. Gluten-free banana bread takes slightly longer than wheat-based versions because the starches need more time to set properly.
Remove the tin from the oven and place it on a wire cooling rack. Let the bread cool in the tin for 15 minutes. This cooling time prevents the bread from falling apart when you remove it.
After 15 minutes, use the baking paper overhang to lift the bread out of the tin. Place it directly on the wire rack to cool completely. This takes about 45 minutes. Cutting warm gluten-free bread creates a gummy texture, so patience here matters.
Storage instructions: Wrap cooled bread tightly in cling film or store in an airtight container at room temperature for up to 3 days. Refrigerate for up to 1 week, or freeze individual slices for up to 3 months. Toast frozen slices directly from the freezer.
Troubleshoot common gluten-free baking issues
Dense or gummy texture usually means too much flour or overmixing. Measure flour by spooning and leveling, not scooping. Mix just until combined, leaving small lumps. Gluten-free flour needs less mixing than wheat flour because there’s no gluten to develop.
Bread falling in the centre happens when the oven temperature is too high or the bread isn’t fully baked. Use an oven thermometer to verify your actual temperature. Many ovens run hot or cold. If your bread rises beautifully then collapses, it needed 5 more minutes of baking time.
Dry or crumbly results come from too much flour or not enough fat. Check your flour measurement technique. Make sure you’re using the full amount of butter or oil. Gluten-free baking needs more moisture than traditional recipes.
Strawberries sinking to the bottom means your batter was too thin or your fruit was too wet. Pat strawberries completely dry before cutting. Make sure your batter is thick enough to suspend the fruit pieces. Toss strawberry pieces in 1 tablespoon of flour before folding them in.
Uneven baking with dark edges and raw centre indicates oven temperature problems. Lower your temperature by 10°C and bake longer. Cover the top loosely with foil after 35 minutes if it’s browning too quickly.
For high altitude baking (above 900 metres), reduce baking powder to ¾ teaspoon and increase oven temperature by 15°C. The bread will need slightly less time, so start checking at 45 minutes.
If your oven runs hot or cold, adjust accordingly. An oven thermometer costs just a few pounds and solves most baking problems. Place it in the centre of your oven to get accurate readings.
This IBS friendly bread keeps well and tastes even better the next day as the flavours develop. The texture firms up slightly after cooling, making it perfect for toasting. Serve it with lactose-free butter or your favourite low FODMAP spread.
Gluten-free banana strawberry bread
Prep time: 15 minutes | Baking time: 55 minutes | Portions: 10 slices
Ingredients:
- 250g gluten-free plain flour
- 1 teaspoon baking powder
- ½ teaspoon bicarbonate of soda
- ¼ teaspoon salt
- 100g caster sugar
- 3 medium ripe bananas (300g)
- 2 large eggs
- 80ml lactose-free butter or oil
- 1 teaspoon vanilla extract
- 150g fresh strawberries, quartered
Method:
- Preheat oven to 175°C and line a 900g loaf tin with baking paper
- Mash bananas with a fork until mostly smooth
- Wash, dry, and quarter strawberries
- Whisk together flour, baking powder, bicarbonate of soda, salt, and sugar
- Mix mashed bananas, eggs, melted butter, and vanilla in a separate bowl
- Pour wet ingredients into dry ingredients and fold gently until just combined
- Fold in strawberry quarters with 3 to 4 gentle strokes
- Pour batter into prepared tin and smooth the top
- Bake for 50 to 55 minutes until a skewer shows moist crumbs
- Cool in tin for 15 minutes, then transfer to a wire rack
- Cool completely before slicing (about 45 minutes)
Storage: Keep at room temperature for 3 days, refrigerate for 1 week, or freeze slices for 3 months.
This recipe is for informational purposes only and is not medical or dietary advice. Please consult a healthcare professional before making any changes to your diet.